
6. Tools6.4 Class Tools6.4.2 Manage contentThis tool is for managing the content associated with a class, the "classFiles". It works in much the same way as the myFiles tool, except allows further options to be attached to each file uploaded. When this tool is selected, a screen is shown listing all the files and folders currently available to the class on the left hand side, and the file upload area on the right hand side.6.4.2.1 add a fileTo add a file click on the Browse button. This will open a dialogue box which you can use to move to the file you want to upload on the local machine. When you have found the file you want, click OK or Open, depending on your computer. You will be returned to the web page and the file path will be listed in the file box on the form. Then select the directory it is to be stored in from the into directory option (the default is the current directory), and the category that the file is to be displayed from e.g. Lecture notes, Exam library, from the category option. Finally enter a name that will appear as the hyperlink to the file. The rank is a number that will determine the order in which the file is shown (lower ranks are shown first, then higher numbers e.g. rank 0 will be first, then 1,2,3 etc) .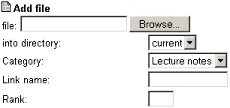
To upload the file, click the "OK" button, below the options. In addition to the simple upload outlined above, various options are available. The activation date determines from when the file will be made available, the deactivation date determines when the file will no longer be visible to students. Whether a file is visible or not is indicated by the  icon. If it is crossed out, icon. If it is crossed out,  , then the file is hidden from the students, otherwise the file is available to the student users. The due date is required only for files put into the assignment category. The sub-heading allows files to be divided into sub-groups within the category they appear. You can select a new heading by entering text or select one currently in use from the drop down menu. The extra info option allows you to input a paragraph of text alongside the file uploaded to give instructions or further explanation of the file etc. , then the file is hidden from the students, otherwise the file is available to the student users. The due date is required only for files put into the assignment category. The sub-heading allows files to be divided into sub-groups within the category they appear. You can select a new heading by entering text or select one currently in use from the drop down menu. The extra info option allows you to input a paragraph of text alongside the file uploaded to give instructions or further explanation of the file etc.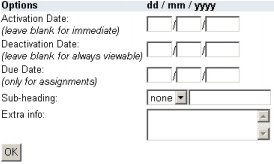
6.4.2.1.1 make directoryTo help you better organise your files, you can make directories. Type in the name you want to give your directory in the "dir" box and press OK. As with files, you can choose to make a directory in a subdirectory by changing the "into directory" box.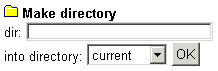
6.4.2.2 edit file detailsCurrently files cannot be edited on the server, so to place a new revision of a file on the site you must re-upload it. If you upload a file with the same name again, you will be asked if you wish to overwrite it or not. If you continue, the file will be replaced along with any additional information you include in the form (link name, category etc). If you cancel, the original file and details will remain.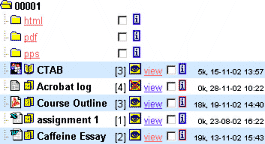 If you want to edit the information associated with the file, click on the  icon next to the file in the list on the left side of the screen. icon next to the file in the list on the left side of the screen. 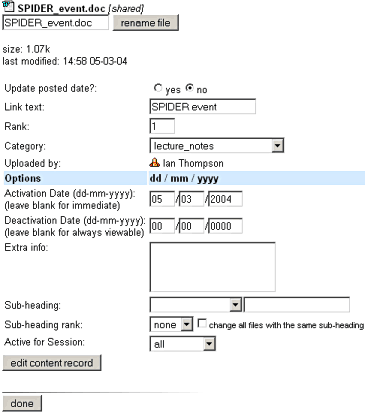 To rename the file, alter the name and click "rename file". To change any other details, alter the value in the relevant box(es), then click "edit content record". When you are happy with your changes, click "done". 6.4.2.3 delete a fileTo remove a file, check the box next to the file on the left side of the screen then click the "delete selected file" button. Any number of files can be deleted at once by selecting a number of boxes. Folders may also be deleted, but they must have all the files in them deleted first.When you have completed managing the content, the link at the lower left of the screen will return you to the class resource page. |