6. Tools
6.2 MyStuff (Student Tools)
6.2.3 myFiles
Note
Since 2007, the University grants web-based access to your H-drive called 'web drive', which provides a much larger and easier to manage file store than the myFiles tool. You can access your web-drive via the myStuff page on SPIDER, via PEGASUS or directly by following the instructions on the web drive web pages
The myFiles page allows you to upload files onto SPIDER so that you can access them from any computer with an internet connection.
When you click on the myFiles link, you will be shown the myFiels page, which lists on the left any files you have in your space, how much filestore you are using, and any shares you have. On the right are tools to: Add files, Make directory and Make a share.

6.2.3.1 Adding files
To upload files:
- click on the Browse button and a dialogue box will open that you can use to view all the files on your computer
- Move to the drive/ directory where the file you want to load is, then click the OK button. The file will be loaded into your space
- You can load files directly into any subdirectory you have created (see below) if you change the "into directory" box

6.2.3.2 Delete files
To delete a file:
- click the box(es) next to the file(s) you want to delete
- click the delete selected button.
The files you have selected will be deleted.

6.2.3.3 Make directory
To help you better organise your files, you can make directories and store files in them.
- Type in the name you want to give your directory in the "dir" box
- press the OK buton
As with files, you can choose to make a directory in a subdirectory by changing the "into directory" box.

6.2.3.4 Make a share
If you want to share your files with other users, then you can create share directories. You may have up to 3 shares at one time and can add as many users to the share as you wish.
- Type the name of the share you want to create in the "Make a share" box
- click the OK button
 To add users to your share
- click on the name link of the share you want to add users to.
- select a user from the drop down list and click "add user" to allow them to access your share.
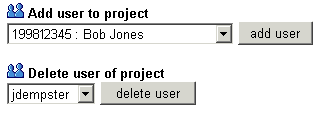 To delete a user from your share
- click on the name link of the share you want to add users to.
- select a user from the drop down list and click "delete user" to remove them from the list of who can access your share.
