6. Tools
6.5 Admin Tools
6.5.8 Managing examination lists via the EEL
SPIDER has an exam marks returning system called EEL (Electronic Examinations Listings), which uses simple cut and paste operations to enter lists of marks for class based tests and assignments. Only sub admin and admin users can manage examination lists for an entire cluster. Class editors are able to manage EEL for a distinct class. It is assumed that marks are available in a format of:
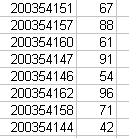
registration # mark
in an Excel spreadsheet, for example:

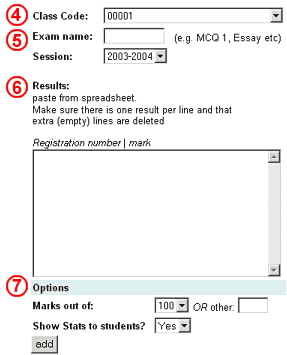
To add a new set of marks
|  |
you will be shown a screen asking you to confirm entry of marks. If you are happy with all the details, click OK, else click the EDIT button to return and make changes.
If you click OK, the marks will be entered. When this is done, an email copy of the entered marks will be sent to the poster (you) and the class co-ordinator for the class. Note: Marks entered are not yet available to students. Once the class co-ordinator and/or poster have double checked the marks are correct (either via the returned email copy or via EEL), the results need to be made live.

To make results live
- go to the view results page
- select the class, session and examination you wish to make live
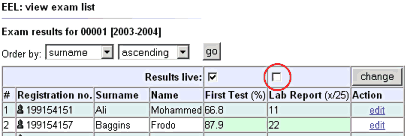
- at the top of the result set is a row called Results live with a tickbox for each test name (as shown above).
- to make a set of results live, tick the box and click the change button
- the results are now visible to the students
To edit or delete an individual mark
- from the view results page, click the edit link next to the student whose marks you want to edit
- change the values for the exam/ test
- click edit to store the results
OR
click delete all if you want to remove all the results for this student - click return to listing to return to the view results page
To add a note to an individuals marks
- from the view results page, click the edit link next to the student you wish to add a note to
- enter the note in the Notes box
- click the edit buytton
- click return to listing to return to the view results page
NB: The note you add will immediately become visible to the student, regardless of the live/pending status of any marks
To replace an entire classes marks
simply re-enter the values by repeating the add exam results procedure, ensuring you use exactly the same name for the Exam name (otherwise the system will assume you are entering date for a new exam/ test). The new data will overwrite the previous entry.
To add a single mark
simply follow the add exam results procedure, pasting just a single registration number and mark, ensuring you use exactly the same name for the Exam name
To delete an entire classes marks
Admins only. To delete an entire set of marks entered via the admin tools.- go to admin tools
- click the delete link next to exam marks
- select the class code and session
- select the exam for which you want to delete all the marks, and click delete
- confirm or cancel the delete. The marks for the whole class will be removed
Class editor users must contact their admin to delete entire class marks.
