6. Tools
6.4 Class Tools
6.4.4 Load web content
This tool allows you to load a package of web files contained within a zip archive file. Each file will be parsed by the system to incorporate the site security and allow user preferences to be used within the web content, as well as adding customised navigation to the files. Once loaded into the system, the module of web content can be configured with various properties.
To load web content:
1. return to the SPIDER home page
2. under staff tools click the pageLoader link under the Web Modules heading
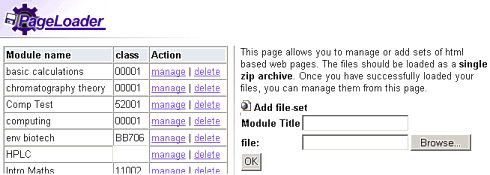
you will see the pageLoader page. On the left are any modules you have uploaded, on the right a tool to upload a new module.

To upload a module:
1. enter a title for the module in the module title box
2. click the Browse button and select the zip file containing all your HTML, images etc e.g. U:\staff\SPIDER_training\pageLoader\basic.zip
3. click the OK button
The system will now upload and extract the files from the zip archive, putting a message on screen to show you its progress. When it is done, it will return you to the pageLoader page. This time you will see your new module on the left, with a process content button under the action heading.
1. click the process content button
2. the system will now look through all the files to add authentication and other system requirements so that the files will work correctly as a module on SPIDER.
3. scroll to the bottom of the page and click the done button
4. you will be returned to the pageLoader page
Now that the files have been processed you can see 2 new options under the action button - delete which will remove the module and all the associated files and manage which allows you to manage your web module within SPIDER
1. click on the manage link
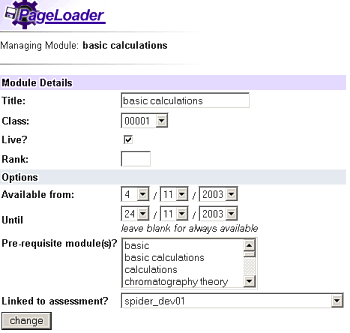
2. you will be shown the Managing module page

In the module details section you can change:
- the module name
- what class its associated with
- whether it is live (visible to students)
- availability dates
- pre-requisite modules (WIP)
- linked assessment (quiz)
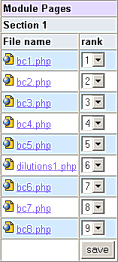
At the bottom of the page in the Module pages section, each web page is listed and you can sort the rank order that they will appear in by altering the values in the drop downs. When you are happy with the order, click the save button to store the changes.

rank 0
Giving an item a rank of 0 means it wont appear in the auto-generated navigation list in the module. This is useful if e.g. you want to have a page that is linked to from other pages in your HTML, but doesn't fall into a sequence of pages
To view your pages, click on any of the links under the File name heading, or if you have made the module live for a class, go to the class resource page and view it via the web modules category (if this category doesn't exist, you can add it via the class tools).
