
6. Tools
6.3 Staff Tools
6.3.8 Self Assessment: quiz build
This gives access to the SWIMS tool to create interactive quizzes. Quizzes are built up in a multi-step process or firstly making questions, then assigning a number of questions to a single quiz. Clicking on the quiz build link brings up a screen with options of questions, quizzes or Test
6.3.8.1 Questions
the questions option opens the question builder tool, SWIMS (Shockwave IMS) question generator. This tool allows the creation of individual questions that can be combined to for a quiz. The builder has some compatibility with the IMS specification (MCQ questions), but to allow for more varied question types, the other question style use an internal standard. Clicking on the questions button loads the shockwave tool. The first menu gives you the option of adding a new question to the database or to edit a previously entered question. The filter sub option allows the list of questions shown after the edit button to be limited to items matching the filter.
6.3.8.1.1 New question
clicking the new question button allows you to add a new question to the database. The screen will show a list of all the question types available. These currently include MCQ (single choice or multiple response T/F), drag & drop, drag & label and numeric style questions.
MCQ single
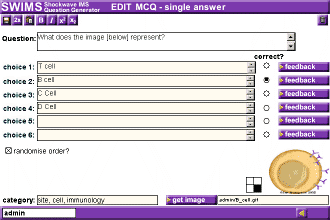
Single answer multiple choice question. Enter the text of the question in the Question box, then up to 6 choices in corresponding choice box. The correct answer is indicated by using the radio button to the right of the choice, under the correct? heading. For each choice, feedback can be given to provide further information as to whether the chosen response is correct or wrong. Options are also available to randomise the order of the options, assigning a category for the question to allow for filtering, and to assign a gif or jpeg format image to the question using the get image button. Image loading is done via an image upload that is identical in operation to the myFiles tool. The image can be positioned in any of the four corners by selecting the corresponding corner in the small box next to the image. Once you have finished inputting the question, click the save button to store the question in the database.
![]()
MCQ multiple
"Multiple response" multiple choice question. These are essentially true/false for each of the options given. Adding this style of question is essentially the same as for MCQ single, above, but each of the (up to) 6 options can be "true" (marked with a checkbox) or false. Feedback is in 2 parts for each option, 1 for correct and one for giving the wrong answer.
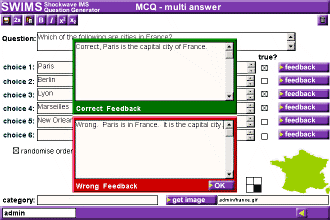
Drag n Drop
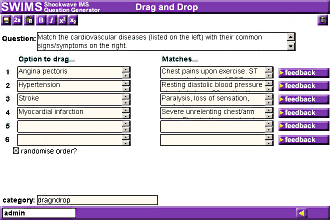
The drag and drop question is made up of options (on the left) that are paired up with matches (on the right) by dragging the option over the match. The options and matches are text based. The correct option and match pairing are entered on the same line. The feedback is again correct/ wrong as in MCQ (multiple) and corresponds to the correct or wrong match. For example, consider the following:
Q. Match the answers on the left to the sums on the right:
| Option to drag | Matches | Feedback | |
| 4 | 2+2 | correct, 2+2=4 | wrong, the correct answer is 4 |
| 6 | 3x2 | correct, 3x2=6 | wrong, the correct answer is 6 |
| 5 | |||
| 8 | |||
Note that the feedback corresponds to the match, not the drag option. Extra dummy options can be included (as above with 5 and 8), but there cannot be more matches than options. Drag and Drop questions cannot have an image associated with them due to size limitations.
Drag n Label
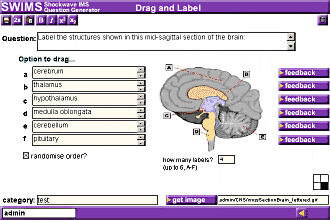
Drag and label questions allow for diagram labelling type questions. Up to 6 labels can be put in the drag options and matched to corresponding lettered labels on the image. At present, the image must itself include labels (A-F), and the options are dragged to fixed letters. Again, image size should be limited to allow the question to be presented in its entirety (approx 300x300 pixels is the maximum recommended). Dummy options can be included, and the number of labels required is put in the how many labels box. Right and wrong feedback is again available for each match.
Numeric
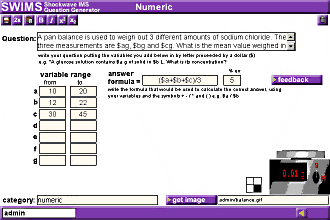
Numeric questions allow for the input of numerical responses. The question is made up from a text question, as in all other question types and a response, which can either be a value or a formula to be evaluated. Variables in the formula can be assigned a range, to allow for a degree of variability in the question. These can also be incorporated into the question text. For example:
Q. A pan balance is used to weigh out 3 different amounts of sodium choloride. The three measurements are $a, $b and $c grammes. What is the mean value weighed (in g)?
In the variables boxes values can be put for the range of the three variables, $a, $b and $c e.g.
| from | to | |
| a | 10 | 20 |
| b | 12 | 22 |
| c | 14 | 26 |
In the formula box: ($a+$b+$c)/3
and in the % err box: 5%
The formula is evaluated when the question is attempted, and the input value compared with the evaluation within the %err paramaters. Formulae can contain any of the symbols:
| * | multiply |
| / | divide |
| ( ) | brackets |
| + | addition |
| - | subtraction |
| E | exponential |
| sqrt(x) | square root of x |
| power(x,y) | xy |
Feedback is limited to correct/ wrong and an image can be uploaded. This allows e.g a graph to be loaded and the question to be as simple as reading a value from the graph to calculating complex formulae based on information on the graph.
6.3.8.1.2 Edit question
Once you have entered questions, you can edit them. When the SWIMS question builder starts, click on the edit button. Optinally you can enter text into the filter box, which will limit the questions to those with a category matching the filter text. Once the edit button is pressed, a list of questions will be shown in a drop down menu. Scroll to the question you want to edit and hit the edit button. The question will be loaded and you can edit it using exactly the same methods you use in creating a new question. Once you have made your chages, click the save button to store them in the database
6.3.8.2 Quizzes
The quizzes button takes you to the Make quiz page. This will list any quizzes you have already created and an option to make a new quiz. There are also options to delete questions, export and load quizzes.
Creating a new quiz is a simple case of inputting a name for you quiz, then clicking the OK button. A quiz will be created with that name. It is recommended that you give your quiz a suitable name, using say, the class code and the topic e.g. 07101 Basic Numeracy.

Once you have created your quiz you can add questions to it and edit other properties. This is done from the same screen you arrive at when editing a quiz. This screen shows:
6.3.8.2.1 Adding Questions
To add questions to your quiz, check the box alongside the question(s) you wish to add in the list under "Add Questions to this quiz", then click the "add questions to quiz" button. After a moment, these questions will be added to your quiz and listed on the screen under the "Questions already in this quiz".

If you have a lot of questions, you can limit which questions appear in this list by using the filter option. You can either select a filter category from the drop down list (which is limited to the categories you entered when creating your question) or enter text in the "or string" box. Clicking filter will then reload the list limiting it to questions that fit your category choice
6.3.8.2.2 Removing Questions

To remove a question from a quiz, check the box alongside the question(s) you wish to remove from the quiz in the list under "Questions already in this quiz", then click the "delete selected Q from quiz" button and they will be removed from the quiz.
6.3.8.2.3 Preview Question
You can preview a single question by clicking on the eye icon
 to the left of the question at any time. This will open the question in the SINQ viewer and allow you to check or test out the question before adding or removing it.
6.3.8.2.4 Modify Quiz details
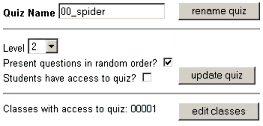
You can change a number of properties associated with each quiz:
Quiz Name
edit the name and click the "rename quiz" button
Level, ordering and access
Level - the difficulty level of the quiz (not yet in use)
Present questions in random order? - check the box for yes, leave blank for presenting in the order they are added to the quiz
Students have access to quiz? - check to allow student to access the quiz, otherwise only staff have access. This will only come into effect if there are classes listed in the "Classes with access to quiz" section.
Once you have made changes to the above 3 values, click the "update quiz" button to save them.
Classes
Classes with access to quiz - this will open a new screen listing all the classes on the system. Check the box(es) next to the class(es) you want to be able to acces the quiz then click "save" to return to the main quiz configuration screen.
6.3.8.2.5 Batch delete, export and load
Returning to the make quiz page, there are options to delete questions from the database, export and load quizzes.
6.3.8.2.5.1 Delete multiple questions
This option takes you to a screen that lists all the questions you have ownership of in the system. The layout is essentially the same as for adding/ removing questions from a quiz, but in this case the question will be deleted from the system, and will no longer be available. You can filter the list of questions using the filter option as in the quiz builder screens. Check the box(es) next to the question(s) you want to delete and then click the "delete questions from database" button. You will be asked to confirm your decision before the questions will be deleted. If you cancel you will be returned to the selection page, otherwise you will see confirmation of the questions deletion. If a question is still associated with a quiz it will not be deleted and a message will be shown to indicate which quizzes it is currently associated with. When you have noted any messages, click the "done" button to return to the selection screen.
6.3.8.2.5.2 Export quiz questions
This option allows you to save an entire quiz to a file which you can download for safekeeping or reload into the system. Select the quiz you want to save from the drop down list, then click the "Export" button. You quiz will be packaged into a file, and link to the file displayed. Right click on the link and choose save as or hold shift before clicking to open the file for saving.
6.3.8.2.5.3 Load question file
This option is the inverse of exporting. Click browse to find the question file you want to load into the system, then click the load button. If the load is successful, the questions will be listed as they are included in the database. You can then add the questions to a quiz.
6.3.8.3 Test
Once you are happy with a quiz you can click the test button. You will be presented with drop down list of the quizzes belonging to you in the system. Select the quiz you want to test, and click the "go" button. The quiz will be shown int the SINQ viewer so you can test your quiz. However, the results will not be stored or saved when doing a quiz from the test screen. You can test with store and save options if you go to a class associated with the quiz and carry it out from there. Once you have added a quiz to a class it will automatically appear in the "assessments and quizzes" category. Remember, you can limit access to only staff users by unchecking the "Students have access to quiz" option, to test without students seeing it. Quizzes that are available only to staff will have padlock icon next to them:

